/
Truancy Call - Install Instructions - Integris
Truancy Call - Install Instructions - Integris
- Chris Hayes
Owned by Chris Hayes
Follow the instructions below to download and install the Truancy Call software.
Download Truancy Call Software
System Requirements
Please check before starting installation: Workstations must have:
- Workstations must have Internet access to both secure (HTTPS) and non secure sites, a sound card and speakers
- Workstations must run: Windows 7, Windows 8 or Windows 10 (32 bit & 64 bit versions). Windows 7/8/10 users, please note that the application requires elevation the first time it is run. See below for further information. Windows XP and Vista are not supported.
- Workstations must run: Windows Media Player 9 or above (this can be downloaded here: windows media player 9)
- Windows 10 needs .net framework 3.5 enabled/installed
If your school cannot comply with any of the above requirements contact our support team for further guidance.
Pre-install Notes
- Permissions - As a default, this program will install to a folder called \Truancy Call (we strongly recommend the program is installed to its default location). Depending on your setup, it may be necessary to grant users of Truancy Call permissions to this folder to allow reading / writing. If the user hasn't got full access to this folder it will cause problems with certain functions performed by Truancy Call.
- Schools must grant Truancy Call access to Integris by completing the RM Datashare. More information about this process can be found here. Once you have done this, please contact our Support Team who will give you the Integris Datashare ID you require to configure Truancy Call.
RM Integris
- For Truancy Call to link into Integris the datashare needs to be setup.
- Within Integris select modules>system management>RM Integris Datashare
- Find Contact Group Truancy Call and enable the data share
- Once done this will send the Establishment id to support at contact group. You will need this to configure Truancy Call. If you do not know what it is please call 033 33 13 14 15 option 1 or try emailing helpdesk@the-contactgroup.com
Installing the Software
Follow and confirm these steps in the order they appear, you may wish to print out this page and tick off each step as you perform it.
- Log onto the machine as a user with Admin rights for the workstation.
- Extract the zipped file to a temporary folder and double click the setup.exe in the setup folder
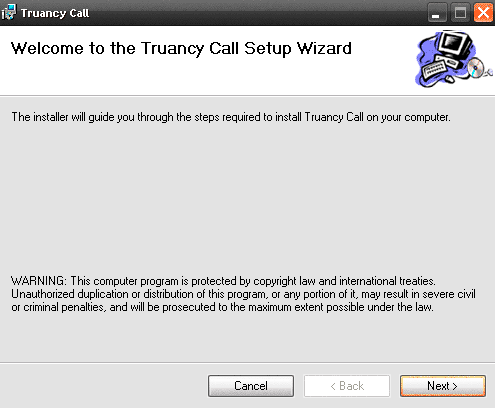
- Click Next to start the setup and then next again once you have read the installation instructions.
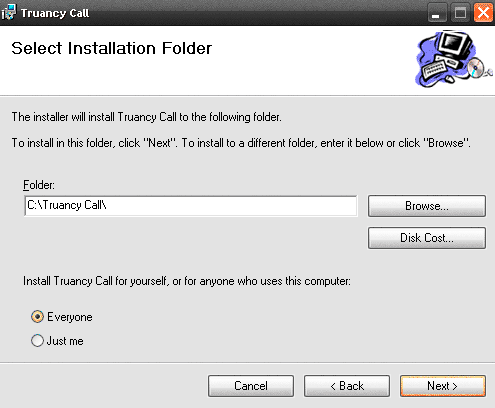
- We advise leaving the location to the default path - but ensure this radio button is set to 'Everyone' to make it available to all users.
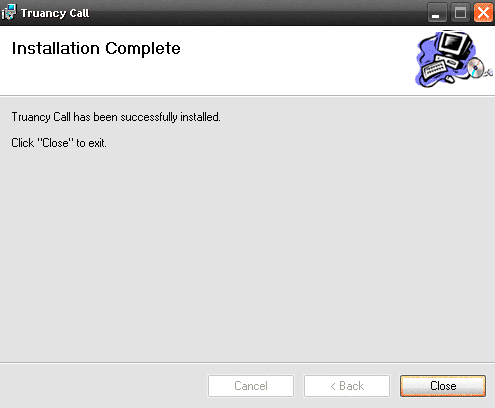
- The setup will complete, click Close to exit and continue with the setup
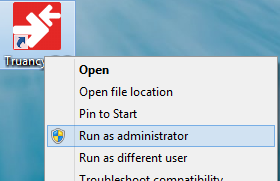
- Whilst still logged in as an administrator, hold down 'Shift' & right-click the application shortcut, then select 'Run As Administrator'. Once the software has been configured it will run with standard user permissions.
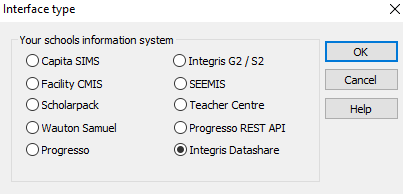
- Select Integris Datashare for your schools information system
- Enter the Integris DataShare ID - this is supplied by our Support Team
- Path to shared folder. This can be any location where all users/potential users of Truancy Call can access - e.g. a shared documents area. File permissions need to be - read/write/modify or better.
- When done, press OK to continue.

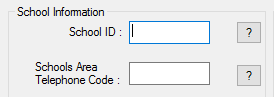
- Fill in the School id number, which will have been sent to you when you purchased Truancy Call. If you don't have this you will need to contact the purchaser or our support team for the information.
- Schools area telephone code - This is the first part of the school's telephone number - for example 0121 - is used for numbers that do not have an area code.
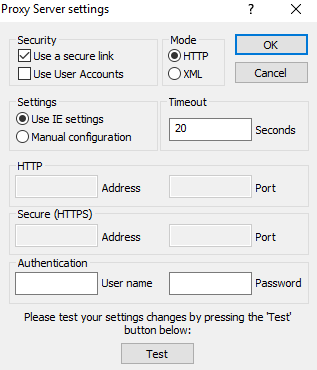
- Click on the Proxy settings button to confirm that Truancy Call can access the internet. Most users will simply need to leave this as the default and click Test to confirm that the settings work. If the system cannot connect please fill in the details for connecting via a proxy server. Note: Truancy Call support do not have the details of your proxy server settings, please contact your system support for this data.

- Confirm the details that appear, checking the school name is correct. If it is not, please contact the support team.
- Click OK to finish the setup and launch the software.
When first run it will prompt you to download an update. Select 'Yes' and follow the on screen prompts

Press 'OK' to complete. Then re launch the software to begin.

First Launch
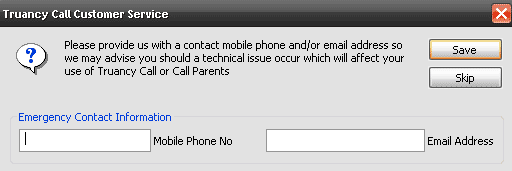
- When you first login to Truancy Call it will ask you for emergency contact details. Please add your mobile number and email address in the boxes provided. That way if there is a problem with our system we can inform you straight away, and you don't waste time trying to fix it your end.
- To confirm Truancy Call is connected to the database, click the Select Students button and select Whole school you should see all the students listed in the lower window.
- Close Truancy Call and advise the user of their login details.
Check if Truancy Call is working
Perform the following checks before handing Truancy Call over to the user, to ensure the system is functioning
- Truancy Call can retrieve student names and parent contact information. Add students to the main list. Select one of them by double clicking a student and pressing the OK button. Once the data as been retrieved, the Status of the call should show as Ready to call or Ready to text. Once confirmed cancel the call by highlighting it and clicking the delete key.
- Truancy Call can retrieve todays absent students. If attendance data has been entered into the attendance system for the day, Truancy Call can search for unexplained absences by pressing the Get Absent Students button. If once the data as been retrieved, the Status of the call should show as Ready to call.
- Truancy Call can play audio messages. Go to >Settings>Configure>Test Truancy Call Look for Voice messages heading and press the Test button You should get a voice saying "test message" played through your speakers
Errors
- If you encounter errors whilst installing, please search for that error in our knowledge base.
Related articles
, multiple selections available,