/
Truancy Call - Install Instructions - CMIS
Truancy Call - Install Instructions - CMIS
- Chris Hayes
Owned by Chris Hayes
Follow the instructions below to download and install the Truancy Call software.
Download Truancy Call Software
System Requirements
Please check before starting installation: Workstations must have:
- Workstations must have Internet access to both secure (HTTPS) and non secure sites, a sound card and speakers
- Workstations must have the Facility CMIS software installed on them
- Ensure the intended workstation(s) can 'see' the CMIS server. There must be a Network Drive mapped to the CMIS server (this is normally the X:\ drive)
- Workstations must run: Windows 7, Windows 8 or Windows 10 (32 bit & 64 bit versions). Windows 7/8/10 users, please note that the application requires elevation the first time it is run. See below for further information. Windows XP and Vista are not supported.
- Windows 10 needs .net framework 3.5 enabled/installed
- Workstations must run: Windows Media Player 9 or above (this can be downloaded here: windows media player 9)
If your school cannot comply with any of the above requirements contact our support team for further guidance.
Pre-install Notes
- Permissions - As a default, this program will install to a folder called \Truancy Call (we strongly recommend the program is installed to its default location). Depending on your setup, it may be necessary to grant users of Truancy Call permissions to this folder to allow reading / writing. If the user hasnt got full access to this folder it will cause problems with certain functions performed by Truancy Call.
Installing the Software
Follow and confirm these steps in the order they appear, you may wish to print out this page and tick off each step as you perform it.
- Firstly if your CMIS data is stored in an SQL Server, rather than Microsoft Access, please check and make a note of your exact connection info by selecting Database>Connection from within the CMIS Admin application. This can also be useful if you are unsure exactly where your Microsoft Access database is located.
- If you are using CMIS with SQL server - A typical SQL Server connection will look like this: Note these settings:
- UserName in Database account details
- Table Owner in Options
- How to find your CMIS Data Set or Set ID. In order for Truancy Call to identify which data to look at it needs to know your Set ID. Within CMIS Admin look for the highlighted information as shown in the screenshot - it normally appears as the current academic year
- Alternatively, within CMIS Admin select Options>Selected Data Set - the highlighted one is the current Set ID
- Log onto the machine as a user with Admin rights for the workstation.
- Extract the zipped file to a temporary folder and double click the setup.exe in the setup folder
- Click Next to start the setup and then next again once you have read the installation instructions.
- We advise leaving the location to the default path - but ensure this radio button is set to 'Everyone' to make it available to all users.
- The setup will complete, click Close to exit and continue with the setup

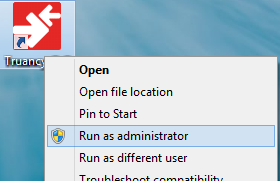
- Whilst still logged in as an administrator, hold down 'Shift' & right-click the application shortcut, then select 'Run As Administrator'. Once the software has been configured it will run with standard user permissions.
- Select CMIS for your schools information system
Microsoft Access Setup
- If your CMIS software uses Microsoft Access, change the dropdown to read Microsoft Access and enter your schools CMIS Set ID (normally the academic year date (eg. 2011/2012)
- Click OK and you will then be prompted to browse to your CMIS database. Navigate to the shared CMIS database which is usually a file called facility.mdb, facdata.mdb or admin.mdb. If you dont know the name of your CMIS database file go to Database>Connection within CMIS Admin - within the connection string, the path and filename of your database will show: eg. DBQ=d:\Admin\facdata2.mdb
SQL Server Setup
- If your CMIS software uses SQL server, change the dropdown to read SQL server and Enter or Browse to the path to your CMIS folder on your server (eg. X:/ADMIN) If required by your SQL Server, enter SQL User Login, Password and Table Owner. (refer to the notes made when you checked within CMIS - Note it is common that the SQL password is the same as the UserName) If your school uses NT Authenification however, these can be left blank. When done press OK
- You will then be asked to create a connection to your SQL Server - see below.

- Select System Data Source
- Select SQL Server SQL Server from the list and click Next then Finish
- The name of the data source is already filled out for you. Enter Connection from Truancy Call to CMIS in Description field. Enter the name of your SQL Server in the Server field.
- Select radio button which relates to how you connect to your SQL Server:
- With SQL Server authentication using a login ID and password entered by the user you will need to enter the SQL username and password. This information can be obtained from Database>Connection within the
- CMIS Admin application. Click Next
- With NT Authentication using a the network login ID Click Next and ensure Change default database to is selected, and points to your CMIS database. This is normally called facility or student_admin. Click Next
- Click Finish to complete the DSN creation

- Click Test Data Source and if all is well press OK to move on. If it fails, return to the start of the OBDC setup instructions and check all the settings you have added in.
- Click OK to move on to the next screen. Your setup details will be checked and any errors will be highlighted.
- Fill in the School id number, which will have been sent to you when you purchased Truancy Call. If you don't have this you will need to contact the purchaser or our support team for the information.
- Schools area telephone code - This is the first part of the school's telephone number - for example 0121 - is used for numbers that do not have an area code.
- Click on the Proxy settings button to confirm that Truancy Call can access the internet. Most users will simply need to leave this as the default and click Test to confirm that the settings work. If the system cannot connect please fill in the details for connecting via a proxy server. Note: Truancy Call support do not have the details of your proxy server settings, please contact your system support for this data.
- Confirm the details that appear, checking the school name is correct. If it is not, please contact the support team.
- Click OK to finish the setup and launch the software.
First Launch
- When you first login to Truancy Call it will ask you for emergency contact details. Please add your mobile number and email address in the boxes provided. That way if there is a problem with our system we can inform you straight away, and you don't waste time trying to fix it your end.
- To confirm Truancy Call is connected to the database, click the Select Students button and select Whole school you should see all the students listed in the lower window.
- Close Truancy Call and advise the user of their login details.
Check if Truancy Call is working
Perform the following checks before handing Truancy Call over to the user, to ensure the system is functioning
- Truancy Call can retrieve student names and parent contact information. Add students to the main list. Select one of them by double clicking a student and pressing the OK button. Once the data as been retrieved, the Status of the call should show as Ready to call or Ready to text. Once confirmed cancel the call by highlighting it and clicking the delete key.
- Truancy Call can retrieve todays absent students. If attendance data has been entered into the attendance system for the day, Truancy Call can search for unexplained absences by pressing the Get Absent Students button. If once the data as been retrieved, the Status of the call should show as Ready to call.
- Truancy Call can writeback marks. Double click the student selected above, select Amend Report tab. Here you can code reasons for absence once known. Click an absence code and press OK Check within the attendance system to see if mark has changed in todays view.
- Truancy Call can play audio messages. Go to >Settings>Configure>Test Truancy Call Look for Voice messages heading and press the Test button You should get a voice saying "test message" played through your speakers
Errors
- If you encounter errors whilst installing, please search for that error in our knowledge base.
Related articles
, multiple selections available,